Your kid just had the best moment of their entire week — eyes wide, hands in the air, completely lost in discovery — and your photo came out blurry. Again.
It doesn’t have to be that way. The Children’s Museum of Phoenix is one of the most visually rich, photo-worthy places in Arizona, and with a few practical adjustments, you can walk out with photos worth printing, sharing, and keeping forever.
Here’s exactly how to do it.
Why the Children’s Museum of Phoenix Is a Photographer’s Dream
Most indoor venues fight photographers. Dim lighting, bland walls, motionless subjects.
The Children’s Museum of Phoenix is the opposite. Three floors and more than 300 hands-on play experiences create natural, colorful backgrounds that do half the work for you. Your child is always doing something — climbing, creating, experimenting — rather than standing still looking awkward.
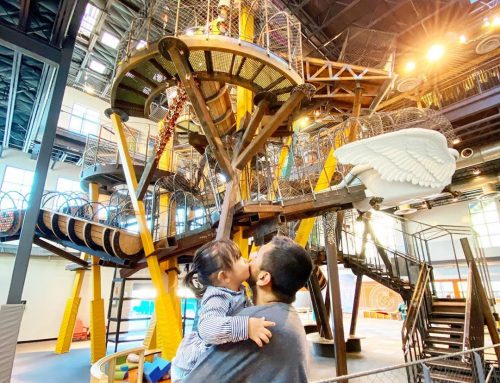
The museum’s exhibits span everything from the iconic Climber, a towering multi-level structure in the center of the building, to art studios, the Noodle Forest, water play areas, and Pedal Power. Every corner offers a new backdrop, and every backdrop is bursting with color.
That variety is your biggest advantage as a photographer.
Master the Light Before You Do Anything Else
Indoor museum lighting is tricky. It’s a mix of natural light from windows, colorful exhibit lighting, and overhead fluorescents — all competing at once.
Here’s what actually works:
On a smartphone: Tap your subject on screen to set focus, then slide the exposure dial down slightly. Most phones auto-brighten indoor shots, washing out the vivid colors that make museum photos special. A small manual adjustment fixes this in seconds.
On a DSLR or mirrorless camera: Start with ISO 800–1600, open your aperture to f/2.8 or wider, and let shutter speed follow. The goal is to freeze movement without turning your photos gray and muddy.
One universal rule: Shoot toward light sources when possible. Position yourself so a window or bright exhibit light falls on your child’s face. The difference is immediate and dramatic.
Know the Exhibits That Photograph Best
Not every exhibit is equally photogenic. These are the ones worth spending time near:
The Climber is the museum’s centerpiece — a massive, multi-level structure that creates natural framing opportunities. Shoot from below looking up to capture kids mid-climb. The scale makes children look adventurous and free.
The Art Studio gives you controlled lighting and stationary subjects. When a child is focused on creating something, they hold still. That’s gold for sharp, expressive portraits.
Water Play Areas capture pure joy. Water droplets mid-air, wet hands, pure delight. Use burst mode here — shoot 8–10 frames per second and pick the best shot after.
The Noodle Forest offers one of the most unique and photogenic environments in the building. Bright, layered, and immersive — kids disappear into it, and the photos show it.
Pedal Power on the roof level provides natural outdoor light, which is the easiest light to work with. On a visit with overcast skies? Even better — soft, even coverage with no harsh shadows.
See the full list of exhibits and experiences before your visit so you can plan where to spend your time.
Timing Your Visit for Better Photos
The museum is open 9 a.m. to 4 p.m. daily, seven days a week. The first hour is your best window.
Fewer visitors means cleaner backgrounds, more freedom to move, and less competition near the most popular exhibits. The Climber and water play areas fill up fast on weekends and school breaks.
Weekday mornings are the sweet spot if your schedule allows. You’ll have more room and your child will get more uninterrupted time at each exhibit — which means more genuine, focused expressions to capture.
Check the museum’s calendar before you go. Special programming days and events can change the crowd dynamic, and some offer unique photo opportunities you won’t find on a regular visit.
Composition Techniques That Actually Work in a Busy Museum
You don’t need a photography degree. You need three techniques.
Rule of thirds: Mentally divide your frame into a 3×3 grid. Place your child’s eyes at one of the four intersection points. Every smartphone has a grid overlay option in settings — turn it on and leave it on.
Leading lines: The museum’s architecture gives you railings, pathways, exhibit edges, and climbing structures that naturally draw the eye toward your subject. Position yourself so one of those lines leads into your child.
Frame within a frame: Doorways, exhibit windows, and the Climber’s structure create natural frames. Shoot through them to add depth and context to your images.
One underrated technique: get low. Shooting from a child’s eye level (or below) transforms an ordinary snapshot into something immersive. It puts the viewer inside the experience rather than looking down on it.
Capturing Genuine Expressions (Without Saying “Cheese”)
The posed smile is the enemy of great photos.
The best images from a museum visit happen when the child forgets you’re there. Give them 2–3 minutes to get absorbed in an activity before you raise your camera. When they’re fully engaged — completely focused on the exhibit — that’s your window.
Burst mode is your best friend. Every modern smartphone has it (hold the shutter button on most models). You’ll take 50 frames to get 3 great ones. That’s not a bad ratio — that’s how real photographers work.
The expression you actually want usually comes in the 3 seconds after a discovery — after the initial reaction, when they’re processing what just happened. Stay ready.
Practical Gear Tips for Your Visit
You don’t need expensive equipment. You need ready equipment. Whatever camera you bring, clean the lens before you walk in. A smudged lens kills more photos than bad lighting ever will.
Smartphone: Portrait mode works great for faces. Switch to standard mode for wide environmental shots. Bring a portable charger — a full day at the museum drains a battery fast.
DSLR/mirrorless: A 35mm or 50mm prime lens is ideal. It handles low light well, produces beautiful background blur, and isn’t so long that you’re constantly stepping back. Simplicity makes you faster.
Skip the flash. The museum’s exhibits are designed to look a certain way. Flash destroys that atmosphere and startles other visitors’ children.
Save Your Best Shots After You Leave
A great photo you never organize is a photo you’ll never find. After your visit, do a quick pass and delete the obvious misses immediately. From there:
- Cloud backup (Google Photos, iCloud, Amazon Photos) handles archiving automatically
- A printed photo book from one visit per year creates something physical and lasting — kids love looking at themselves at younger ages
- A small framed print near their room becomes part of how they remember childhood
The Children’s Museum of Phoenix also features community photos on their social channels. Tag them — you might see your child’s face on their feed.